I decided to go a little bonkers with my garden this year.
Instead of ordinary rows, I have triangle beds and will even have some circles eventually. 
It's fun even though I'm already behind. Who could have guessed spring would come so early?


Although preparing beds is a little more complicated, especially in the form I chose, I think it will be well worth the effort.
- I needed the size of each bed to be approximately the same square footage even if the shape varied so that as I maintain them from year to year the crops can be rotated. The measuring seemed a little daunting.
- I first measured the space I had in the garden, of course, and numbered that on the graft paper. Each square equals two feet in this garden layout drawing. I subtracted four feet for the center aisle. I knew I wanted the rectangle beds to be four feet across. That answered how many square feet I needed to create the triangles.
- Since math has never been my strong point, I ended up drawing what I thought I wanted and just counting the little squares on the graft paper until they were equal. The triangles equal the rectangles in this garden lay-out.

- In the garden I measured to the center of my space, and then two feet on each side of center creating my walking path. I plant it with rye as you can see in the top picture to give me a pathway that is lovely and will choke out many of the weeds.
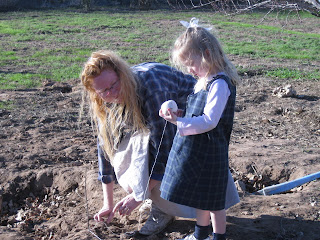
- Enlisting my daughter and grandkids, I marked the path with sticks. If you have wonderful garden stakes, of course, that would be more appealing to the eye, but they are not going to remain after you plant. We have plenty of sticks that were free so we used them instead.
- Next, measure where the cross rows will be and mark those. For this design I made the rows two feet wide except between beds three and four. I wanted a strong cross look and a path for wheel barrels so I made that row four feet wide like the center row.
- Mark the rows by tying string to the sticks in each corner.
- Measuring the triangles become much easier because each of the points line up evenly with the rows crossing the width of the garden.
- To divide the square into triangles, start with you corner stake at position "A".
- Move two feet over inside the square even with the already laid out row and put another stake.
- Move diagonally across the square to the "D" corner.
- Move two feet inside the square along that row and put another stake.
- Attach the string from the corner to the inside stake on the diagonal corner.

 Now you have the basic design.

 I've created a five-year rotation plan for my garden, so I want to number my beds consistently year after year. But I wanted unique markers.
 Again, I enlisted my grandchildren. First we had fun gathering the rocks from the creek bed. Then it was great fun to paint numbers on the rocks. We were doubly-blessed that day.
Every time I look at the rocks in the corner of my beds I remember the fun time we had preparing the garden layout and I am many times blessed.


No comments:
Post a Comment